Introduction: The “Two Banana” Dilemma Solved
You know what happens. It’s Sunday morning. The coffee is brewing. You suddenly crave homemade banana bread. You look at the fruit bowl, hoping for a lot of fruit, but instead you see a sad math problem: leftover bananas. In particular, only two of them. But don’t panic, because that is actually the perfect amount for this moist 2-banana bread recipe.
Many classic recipes from well-known sites like Simply Recipes and Seasons & Suppers use three or four overripe bananas. This gives the dish its signature squishy texture. So, you stand there using 2 ripe bananas, completely helpless. Are you willing to take the chance of getting a dry, heavy brick? Do you wait three days for a new bunch to grow those important brown spots?
Absolutely not.
You don’t need a third banana to make moist banana bread. Many big baking blogs often overlook this fact. Kitchen chemistry is all you need to know. The “Two Banana Dilemma” isn’t about not having enough fruit; it’s about not having enough water. When you take a banana out of a recipe without changing the wet ingredients, you lose volume and moisture.
This guide will help you. We aren’t just giving you a simple, quick bread recipe. It is as easy and family-friendly as my Salisbury steak recipe with ground chicken. We created a special recipe using 2 bananas. It makes up for the missing fruit with smart fats like sour cream, Greek yogurt, or milk. This is small batch banana bread that refuses to compromise. You can expect a tall, golden banana loaf. It will be very moist and have less fruit. This recipe is perfect for the ingredients you have at home.
Why This Recipe Works (The Science of Moisture)
Let’s talk kitchen chemistry. A normal banana weighs roughly 100-120 grams. When you go from three bananas to two, you lose more than just flavor. You also lose about half a cup of important liquid and carbs. If you don’t plug that hole, your banana loaf turns into a crouton.
The secret to this 2 banana bread recipe is in the moisture balance. We borrow a trick widely touted by authorities like Bread Dad, but we take it a step further. To restore the missing fruit volume, we provide full-fat dairy. Adding a little milk can help moisten the flour. However, the best choice is sour cream or Greek yogurt.
Why? Acidity.
Using yogurt or sour cream in banana bread serves two purposes. It adds moisture to the batter. The acid in these ingredients reacts with the baking soda. This reaction helps create a soft, fluffy texture. It prevents the loaf from becoming dense. It’s the difference between a “good” loaf and a bakery-quality one.
Then there is the famous debate: oil vs butter for moistness. Here is the verdict. Butter (particularly melted butter or creamed butter) delivers the nostalgic, rich flavor that we want. However, vegetable oil generates a loaf that stays soft for days because it remains liquid at room temperature.
For the best texture, we suggest a mixed approach. Use butter if you plan to eat it warm and fresh. Use oil if you want it to stay good on the counter. Understanding this sour cream vs milk and fat combination is what separates the novices from the pros.
Ingredients & Substitutions
Great recipes are not born in the oven; they are born in the prep bowl. Since we are using a 2-banana recipe, there is less room for error than with a three-banana recipe. Every part of the recipe needs to be perfect.
The Bananas: Ugly is Beautiful
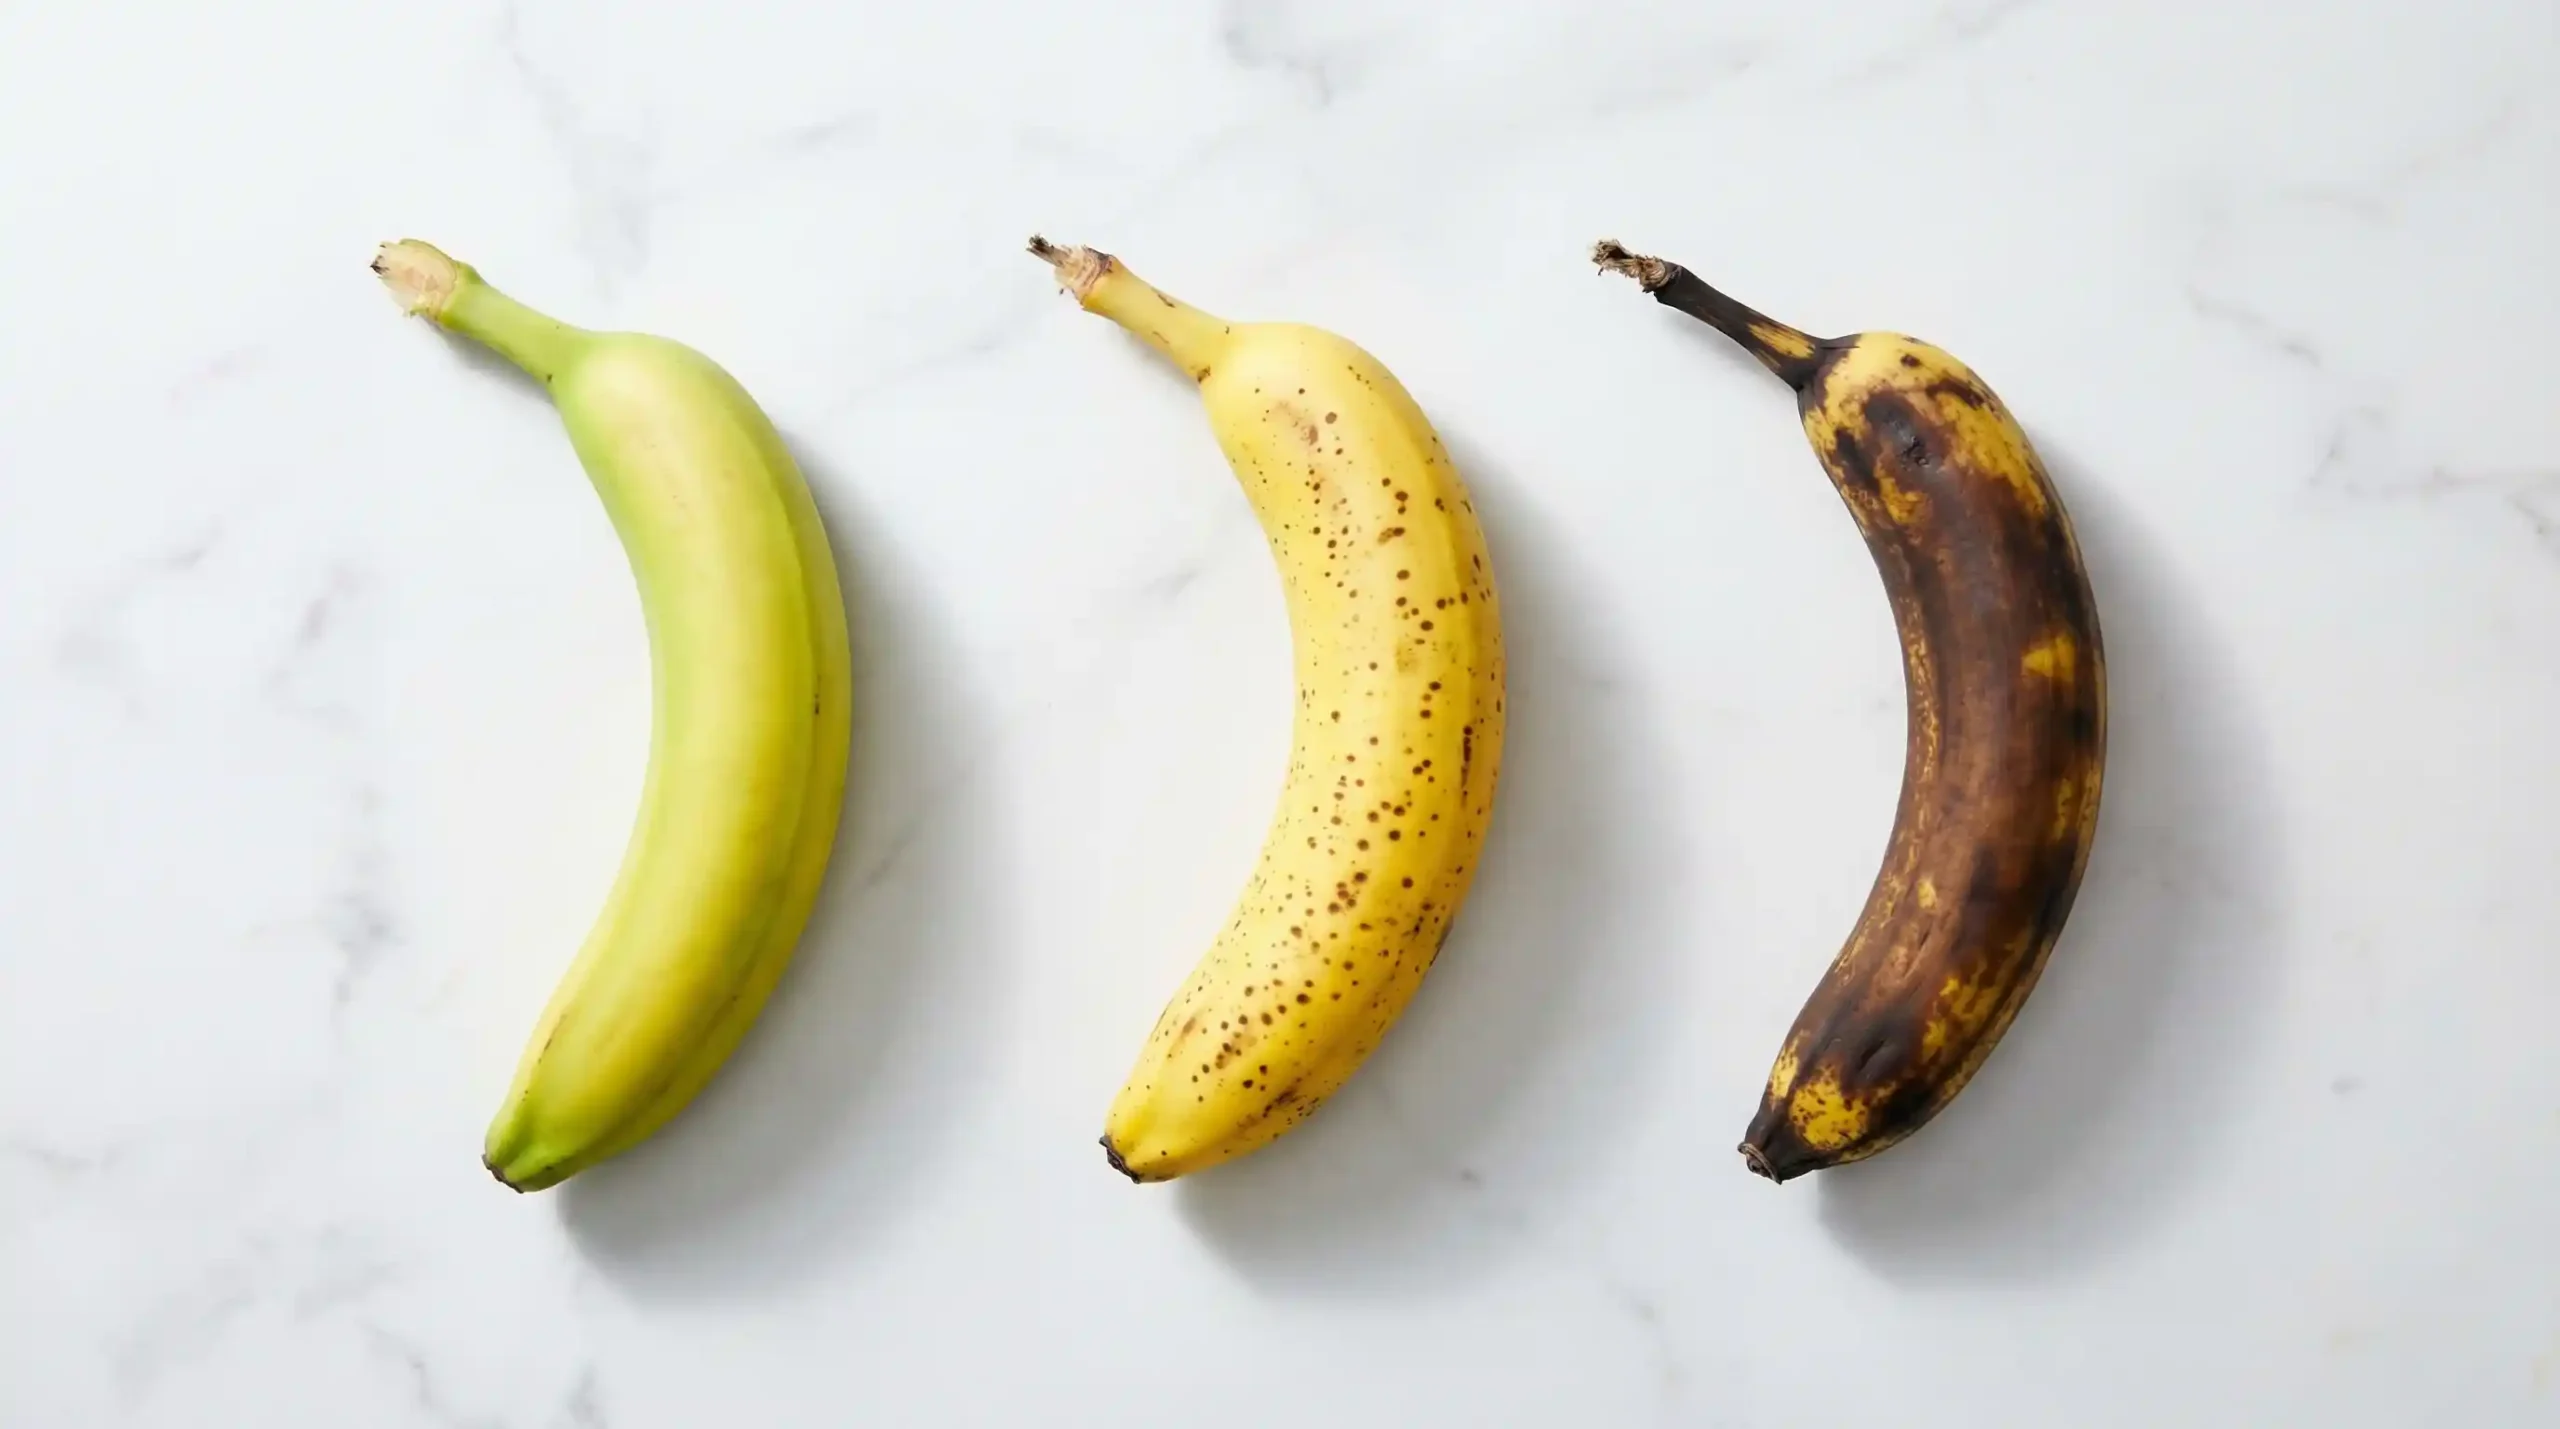
First, let’s address the fruit. If your bananas are yellow with lovely green tips, put the bowl away. You want overripe bananas. We are talking about fruit that looks like it has gone five rounds in a boxing ring. Look for the “Leopard Spot” rule: strong brown spots or fully black skins. These “ugly” bananas have transformed their carbohydrates into pure sugar, which provides that rich, sweet flavor and moist crumb.
The Fat: Butter & Oil
We normally choose unsalted butter so you can regulate the sodium, specifically adding around ½ teaspoon of salt yourself. If you only have salted butter, that is fine, just skip the extra pinch of salt later. If you want dairy-free options, you can replace the butter with vegetable oil or melted coconut oil. It modifies the flavor profile but maintains the loaf wonderfully soft.
The Sugar: The Moisture Secret
Do not merely reach for the white granulated sugar. While white sugar helps create that crisp, golden crust, light brown or dark brown sugar is the MVP here. Brown sugar contains molasses, which is hygroscopic (a fancy phrase meaning it draws and holds water). In a low-fruit dish, using a brown sugar substitute can be tricky. But here’s a simple hack: if you run out of brown sugar, mix 1 cup of white sugar with 1 tablespoon of molasses.
The Flour: The Foundation
The best flour for banana bread is regular All-Purpose Flour. Brands like King Arthur are good for protein consistency. Can you use Self-rising flour? Yes, but you must be careful. If you use self-rising flour, skip the baking soda and salt in the recipe. Otherwise, your bread will taste metallic and may collapse.
Critical Ingredient Swaps
Caught empty-handed? Here is how to save the bake:
- No Sour Cream? This is the most common panic moment. You may easily substitute equal parts Greek yogurt (plain, full-fat) or even buttermilk. In a grave case, mix milk with a teaspoon of lemon juice to approximate the acidity.
- No Brown Sugar? As indicated, create your own, or add turbinado sugar for a crunchy top.
- Flavor Boosters: Don’t forget the vanilla extract and a splash of cinnamon. They bridge the gap between “bread” and “dessert.”
How to Quickly Ripen Bananas (If Yours Are Still Yellow)
It is the ultimate baker’s tragedy: the spirit is willing, but the fruit is green. Most rivals like Seasons and Suppers believe you have been planning this loaf for a week. But what if you need to bake right now and your bananas are stubbornly yellow?
Do not cancel your brunch plans. We have cracked the code on how to ripen bananas rapidly. You can deceive Mother Nature with heat.
The Oven Method (Fastest)
This is the “Goldilocks” solution, fast enough to rescue the day, but soft enough to maintain flavor. This oven ripening guide is a game-changer.
- Preheat your oven to 300°F (150°C).
- Line a baking sheet with parchment paper (things are about to get messy).
- Place your unpeeled, yellow bananas on the sheet.
- Bake for 15-20 minutes.
The skin will turn entirely black. Do not panic; this is what we want. The heat breaks down the starches into sugars and softens the pulp. It is essentially baking green bananas into submission. Let them cool, slice them open, and scoop out the soft, delicious gold inside.
The Microwave Method (In a Pinch)
If you are very desperate, we are talking “guests are in the driveway” desperate, you can use the microwave. However, proceed with caution. This approach softens the fruit but doesn’t create the deep sugar profile of the oven method.
Take a fork and poke holes all over the unpeeled banana (unless you want an explosion). Microwave in 30-second intervals. It normally takes about 90 seconds to 2 minutes. Warning: The texture may be slightly more watery, so drain any extra clear liquid before mashing.
The Paper Bag Method (Overnight)
If you have the luxury of time (12-24 hours), go analog. Place the bananas in a brown paper bag and loosely fold the top. For a turbo boost, put in an apple or an already ripe avocado. These fruits release ethylene gas, the hormone that stimulates ripening. Trapping this gas accelerates the process naturally, turning firm fruit into overripe bananas by the next morning.
Essential Equipment: The Pan Size Trap
If there is one reason why your 2-banana recipe has failed in the past, it isn’t your baking skills; it is your hardware. This is the “Pan Size Trap,” and slipping into it guarantees a sad, squat loaf that looks more like a biscotti than a bread.

Here is the physics: A classic recipe makes enough batter for a standard loaf pan. This pan is usually 9×5 inches. But we are working with a tiny batch of banana bread. We have stopped roughly 30% of the volume. If you pour the decreased batter into a huge 9×5 pan, it spreads out too thin. It can’t climb the walls because it barely touches them.
9×5 vs. 8×4 Loaf Pans
To prevent flat banana bread, the geometry counts. For this exact recipe, an 8×4-inch loaf pan is non-negotiable for that bakery-style dome. The lower surface area forces the batter up rather than out. The result? A tall, beautiful loaf stays wet because it is not spread out and exposed to dry heat.
What if I Only Have a 9×5?
We understand that most kitchens only have one “bread pan.” If you are stuck with the larger 9×5 pan, you have two choices:
- Accept the Flatness: Your bread will bake faster and be shorter. It will taste OK, but it won’t be Instagram-ready.
- Hack the Heat: Because the batter is thinner, it will cook faster. Increase your oven temperature by 25°F (to 375°F) and check it 10-15 minutes earlier than the recipe specifies. This enables a rapid rise before the crust sets, helping some of the flatness.
Understanding the struggle between 8×4 vs 9×5 loaf pan sizes is the difference between a “snack” and a “centerpiece.”
Step-by-Step Instructions (With Pro Tips)
This isn’t just about putting ingredients into a bowl; it’s about technique. Follow these steps to guarantee your 2-banana recipe rises to the occasion.
Step 1: Prep & Preheat
First, set your oven rack squarely in the center. Too high, and the crust burns; too low, and the bottom scorches. Preheat oven to 350°F (175°C). As the oven heats up, grease your 8×4 loaf pan well with butter or non-stick spray. You can also line it with parchment paper for easy removal.
Step 2: Mash Masterfully
Peel the overripe bananas into a mixing bowl. Now, you have a decision to make regarding texture. For mashing bananas, use a fork or a potato masher.
- Team Smooth: Mash until liquid for a consistent, cake-like crumb.
- Team Rustic: Leave little bits (pea-sized) to produce luscious, gooey pockets of fruit in the finished bread.
Step 3: Wet & Dry Ingredients
In a large dish, whisk your melted butter (or oil) with the sugars until combined. Beat in the egg, vanilla, and your secret weapon: the sour cream (or yogurt). Stir in the mashed bananas. Now, sprinkle the flour, baking soda, salt, and cinnamon over the wet mix. Switch to a spatula. You are now folding batter, not beating it. Stop mixing the second the last streak of flour vanishes. Overmixing activates gluten, which changes soft bread into a rubbery doorstop.
Step 4: The Bake
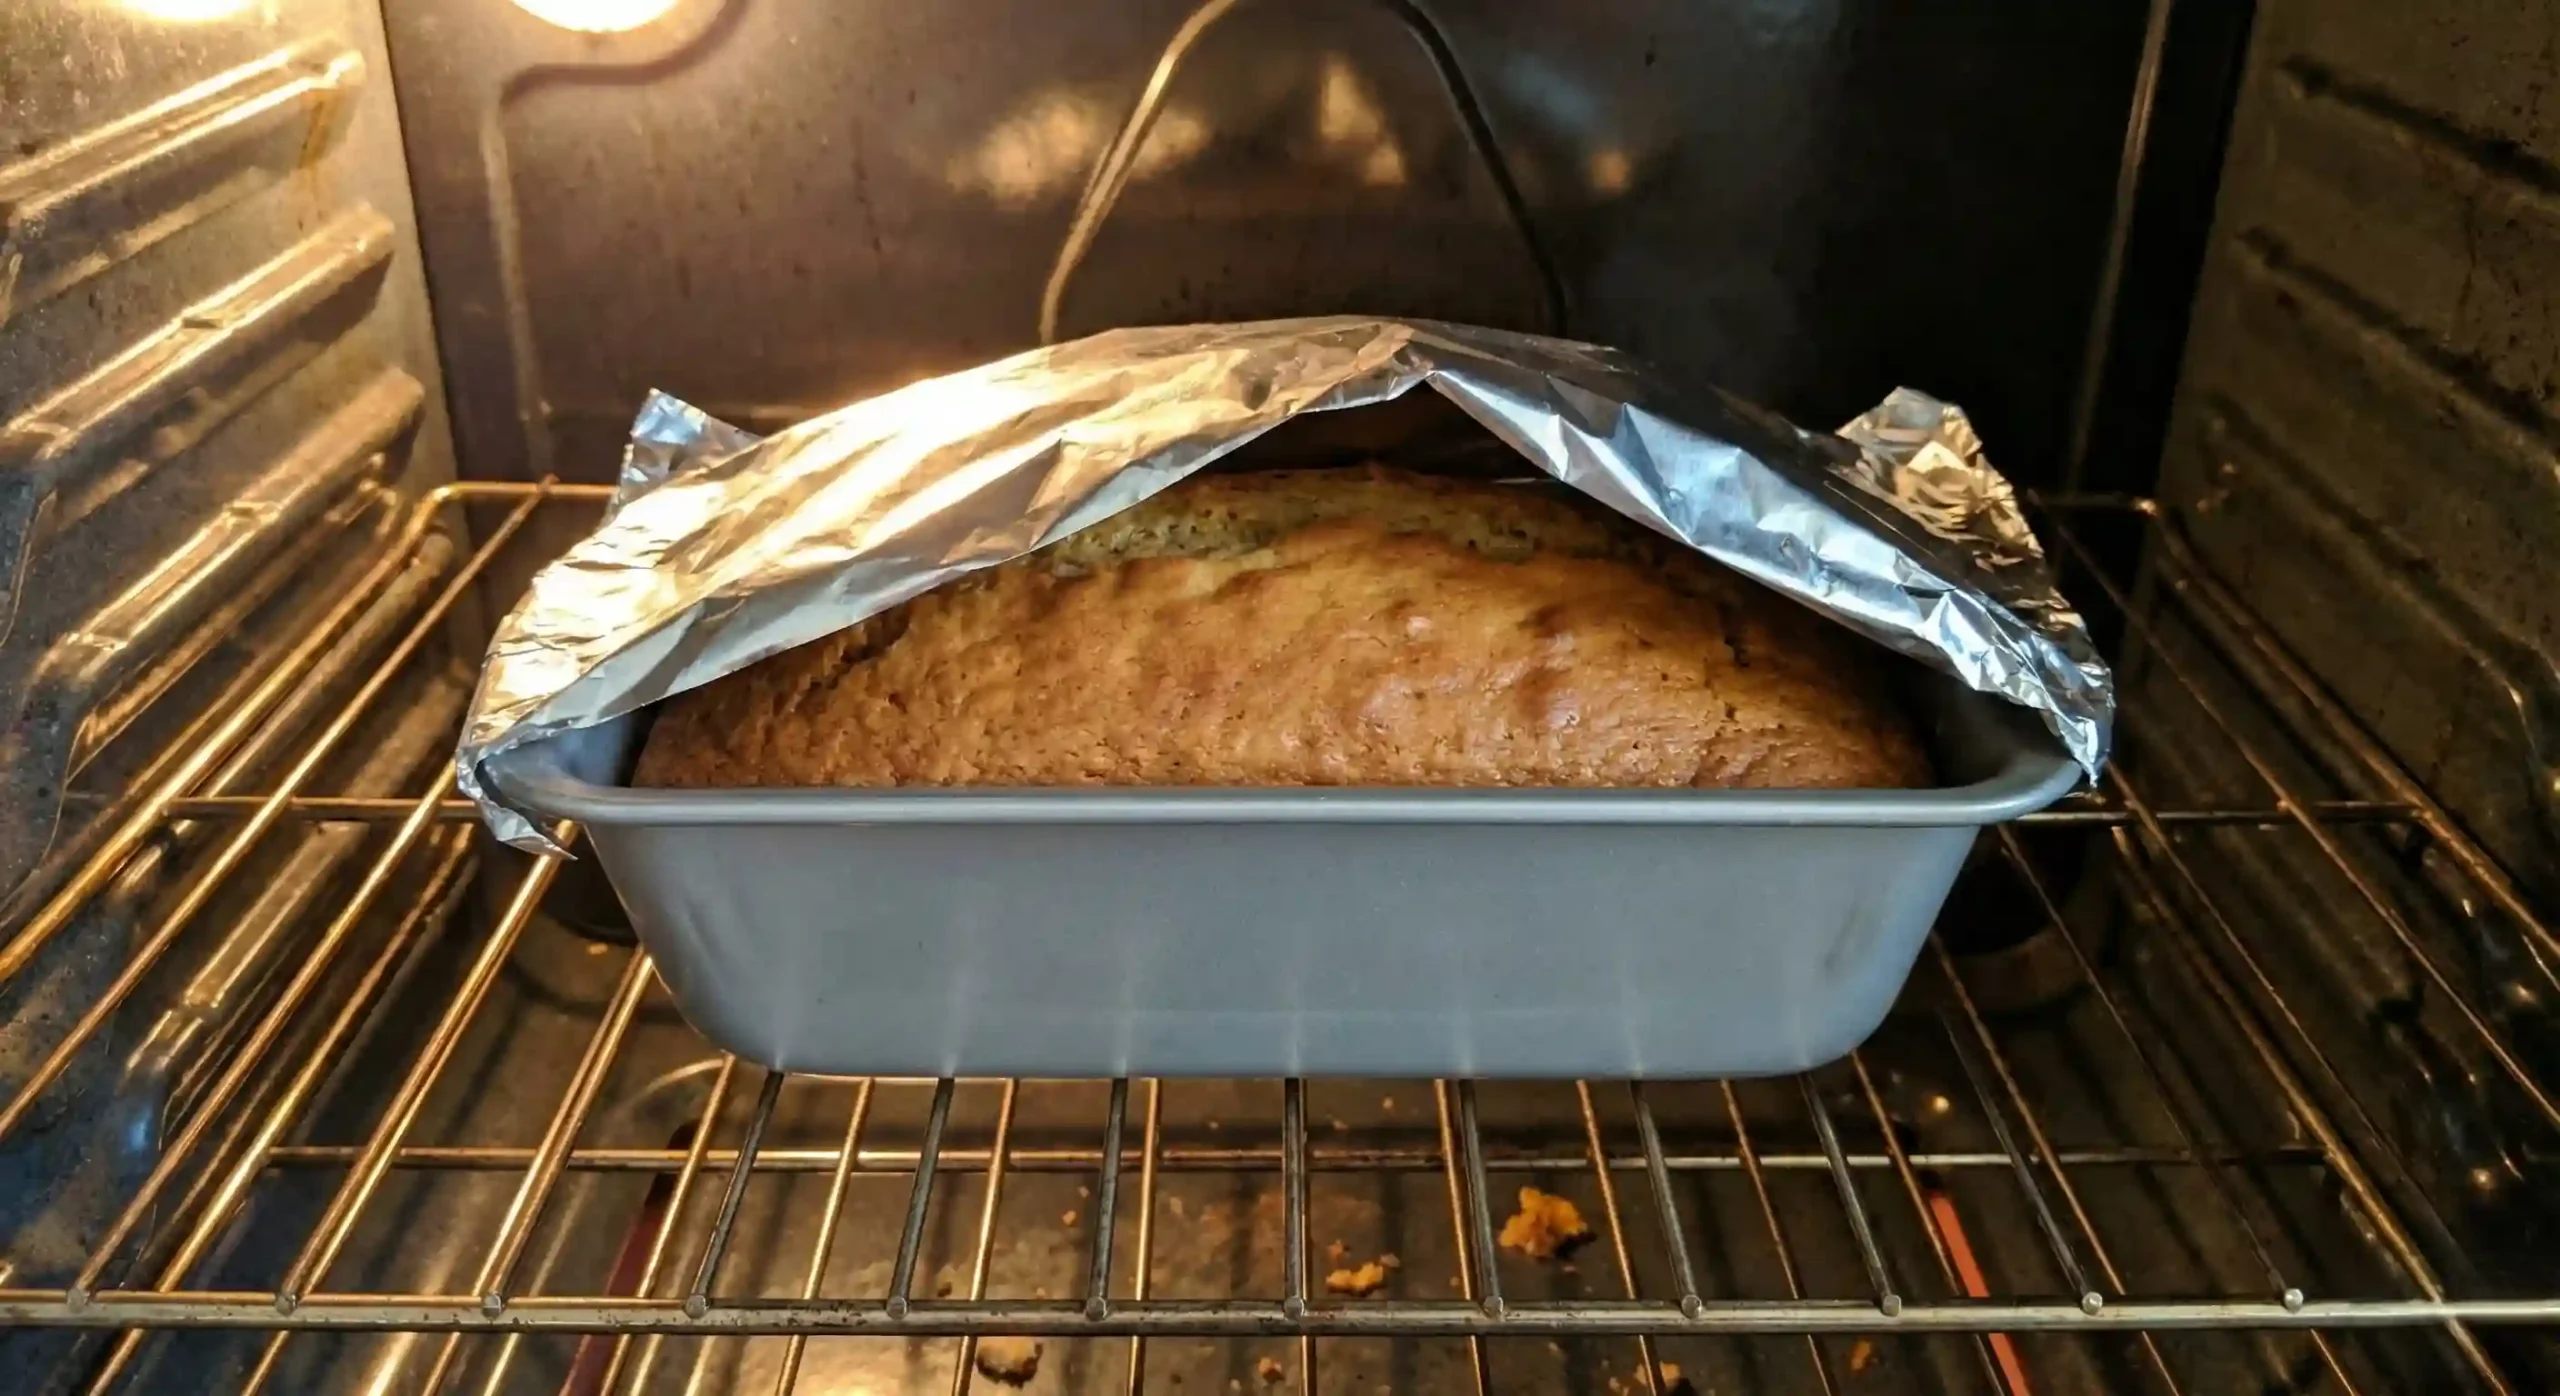
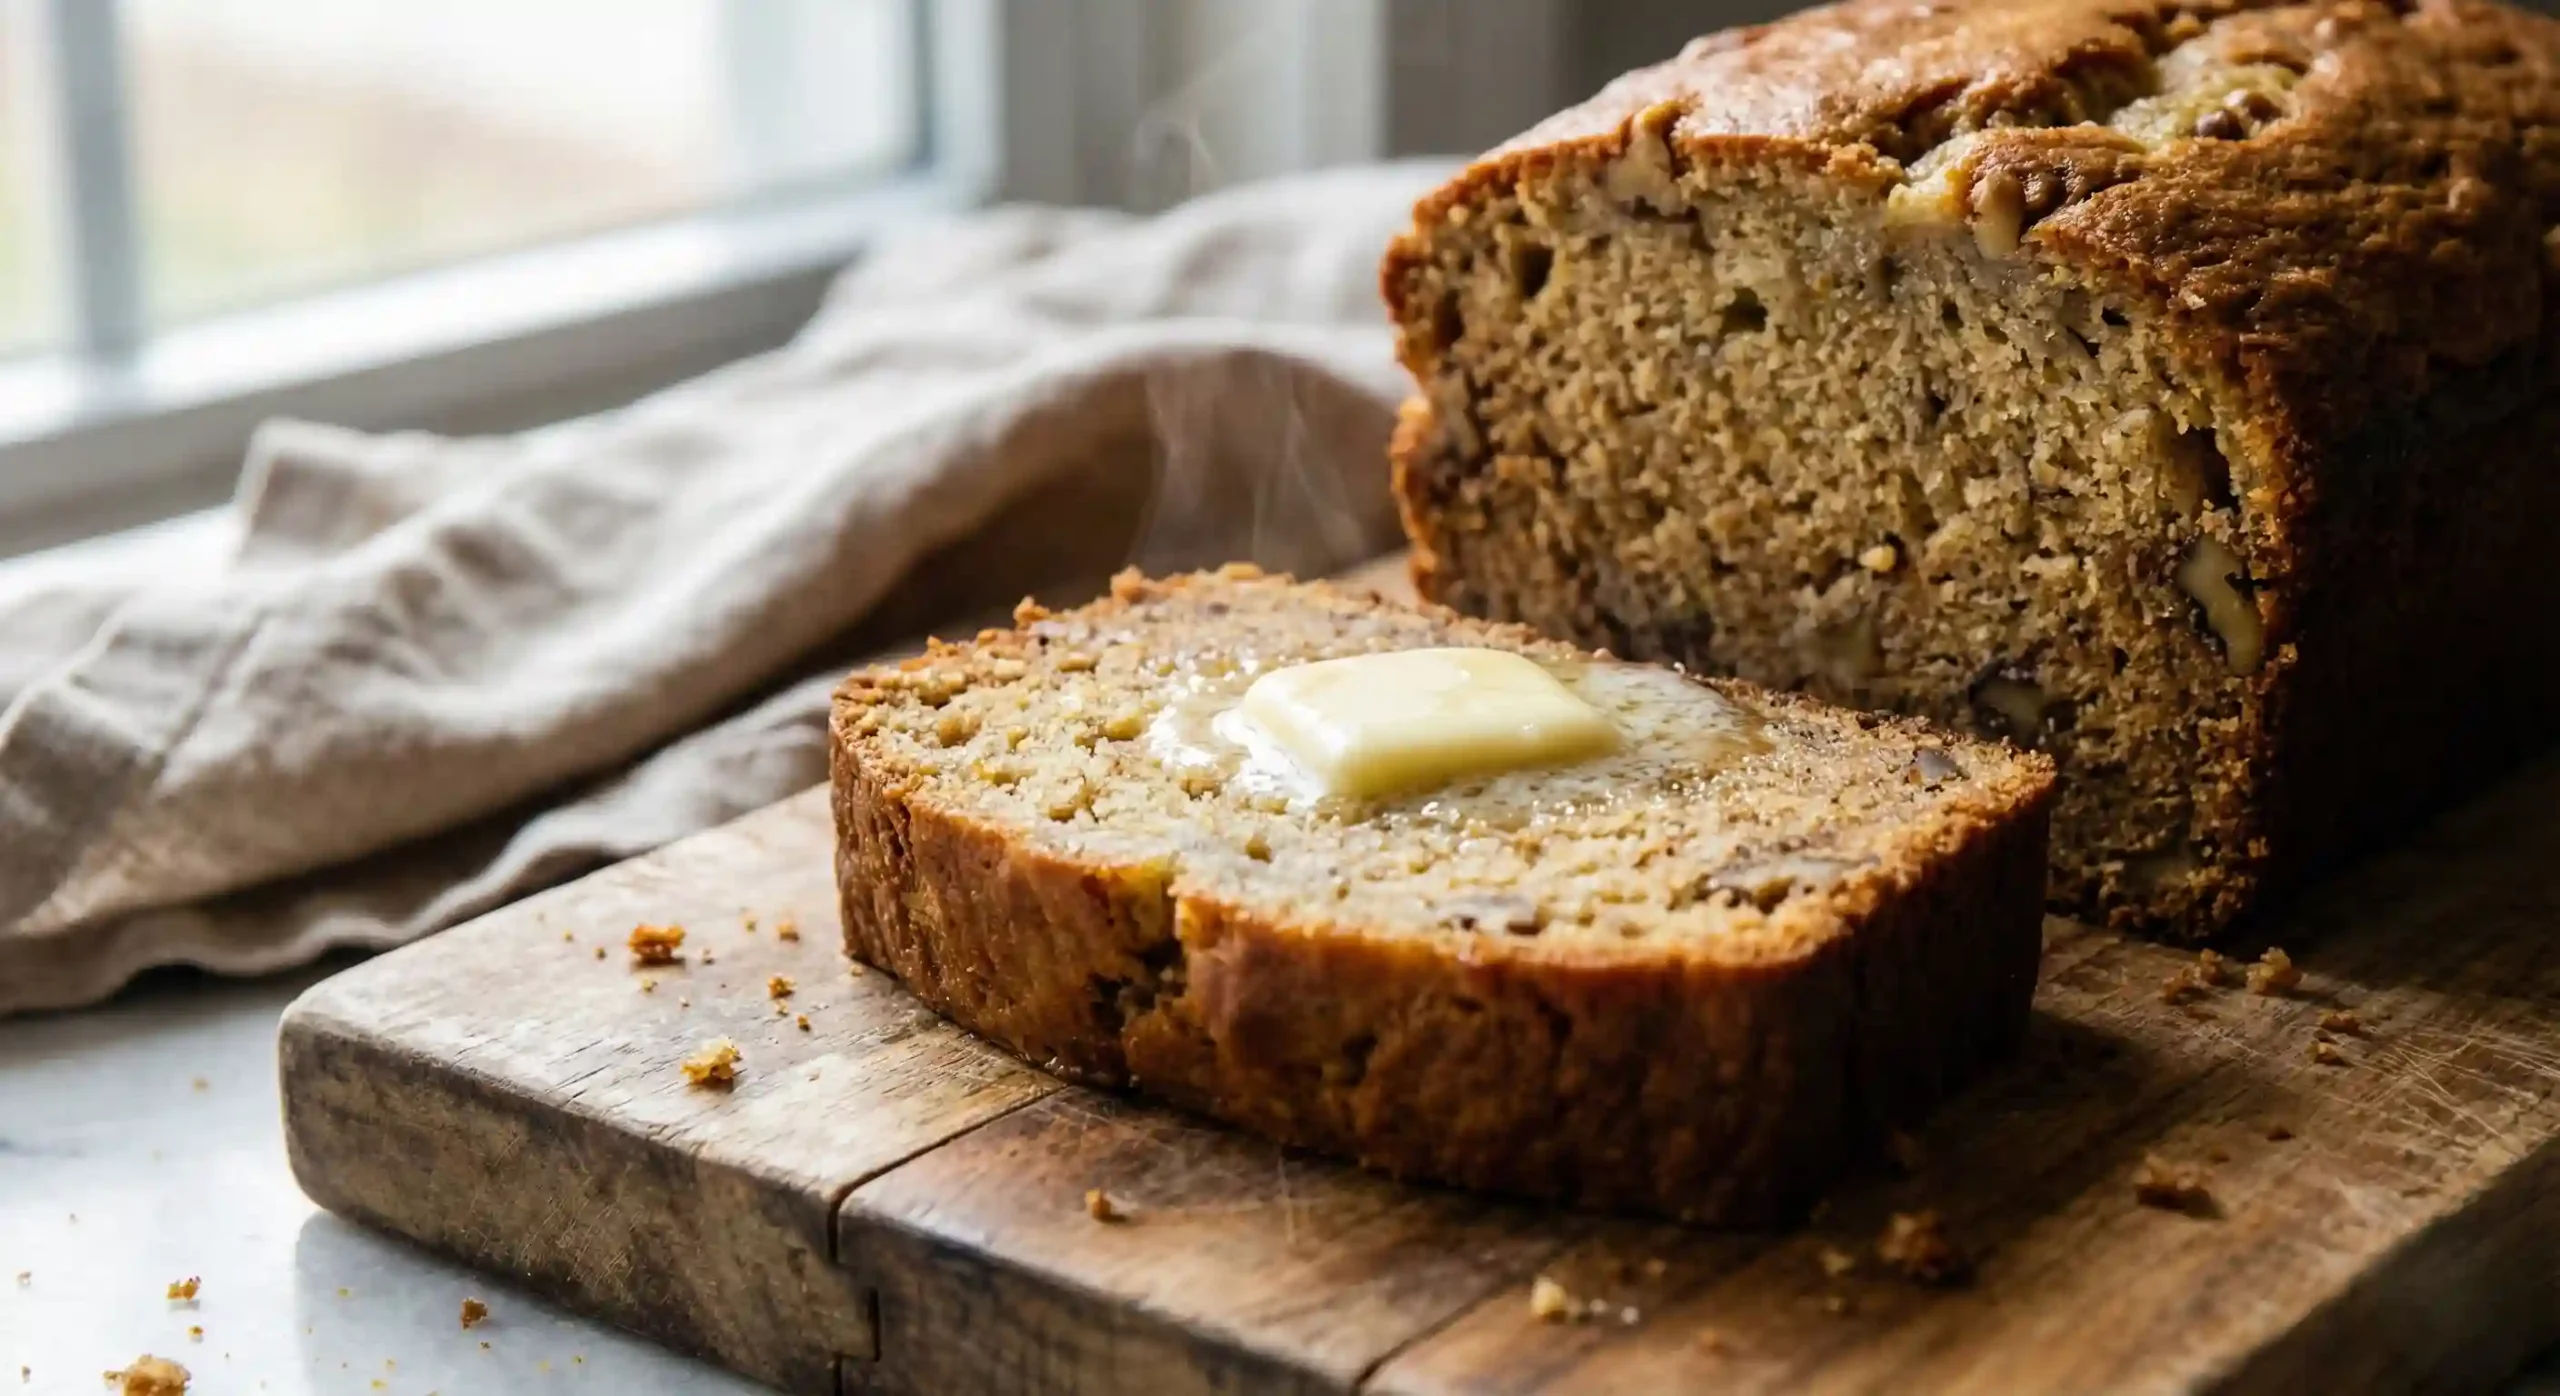
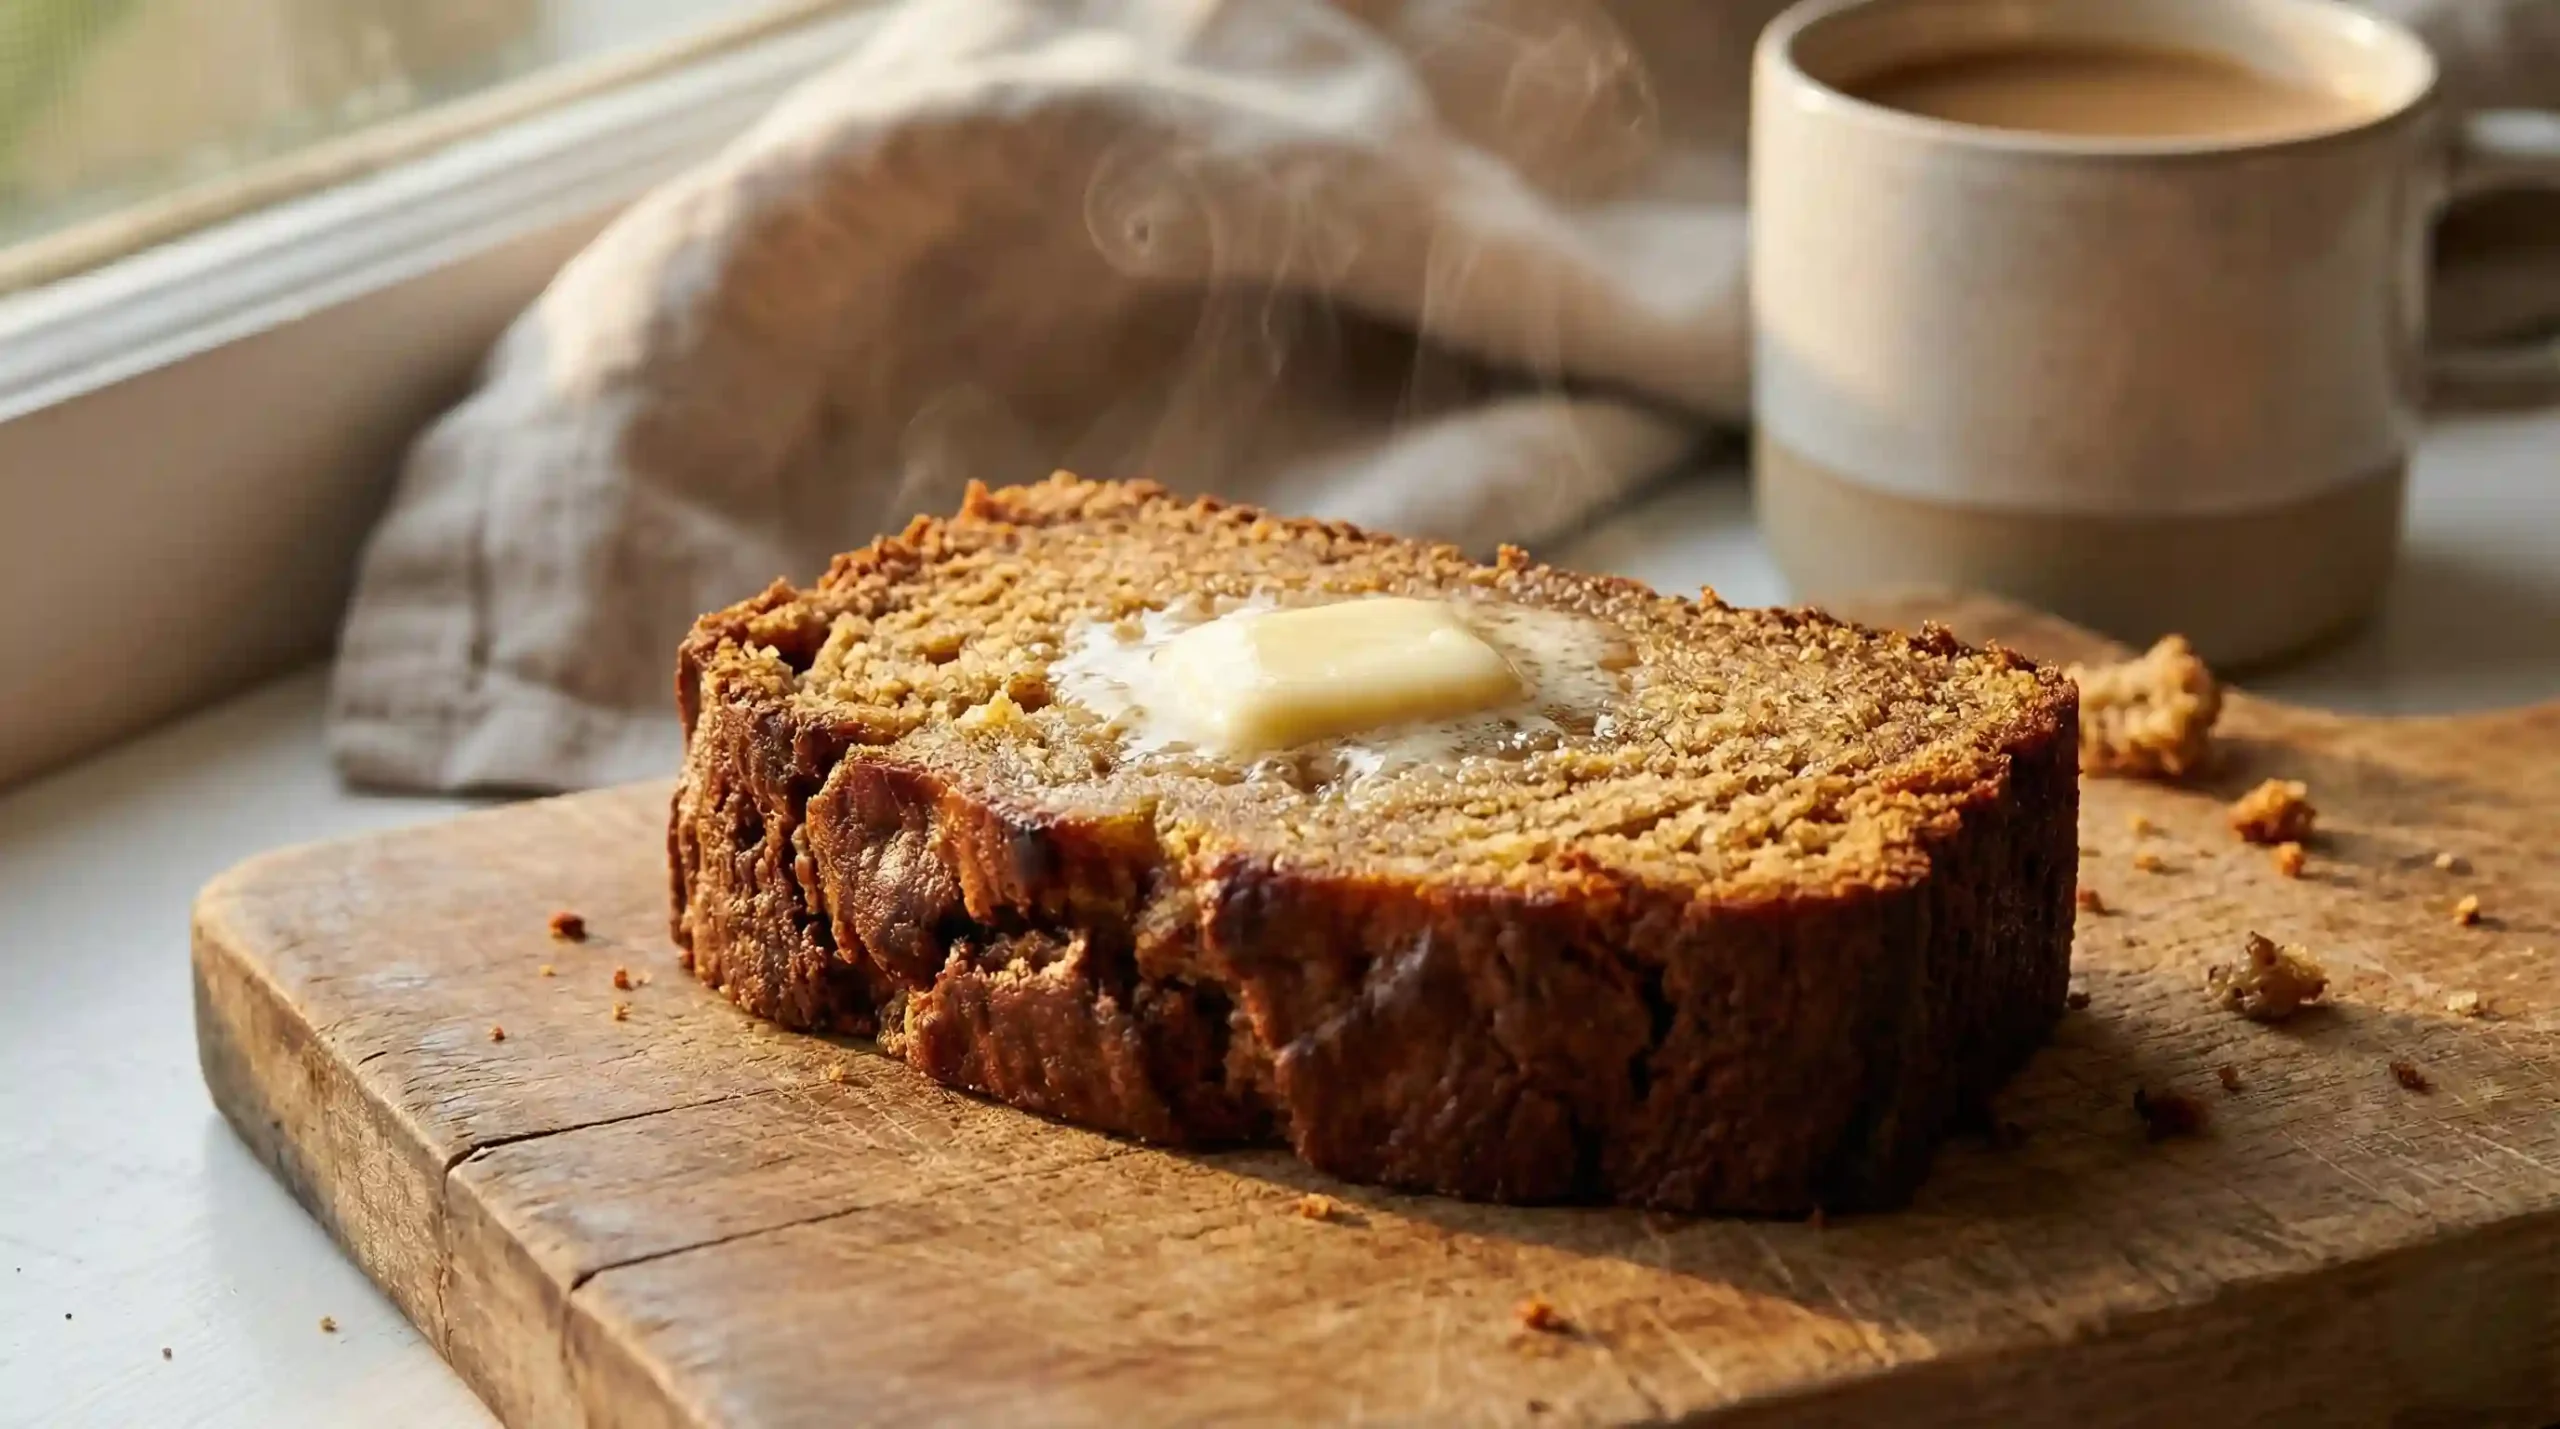
Pour the batter into the prepared pan and smooth the top. Slide it into the oven. Bake for 50–60 minutes. Pro Tip: Check the loaf at the 40-minute mark. If the top is turning dark brown but the center is still unstable, you need to tent with foil. Loosely drape a sheet of aluminum foil over the top to shield the crust while the inside finishes cooking. The bread is done when a toothpick put into the center comes out with a few moist crumbs attached (not wet batter).
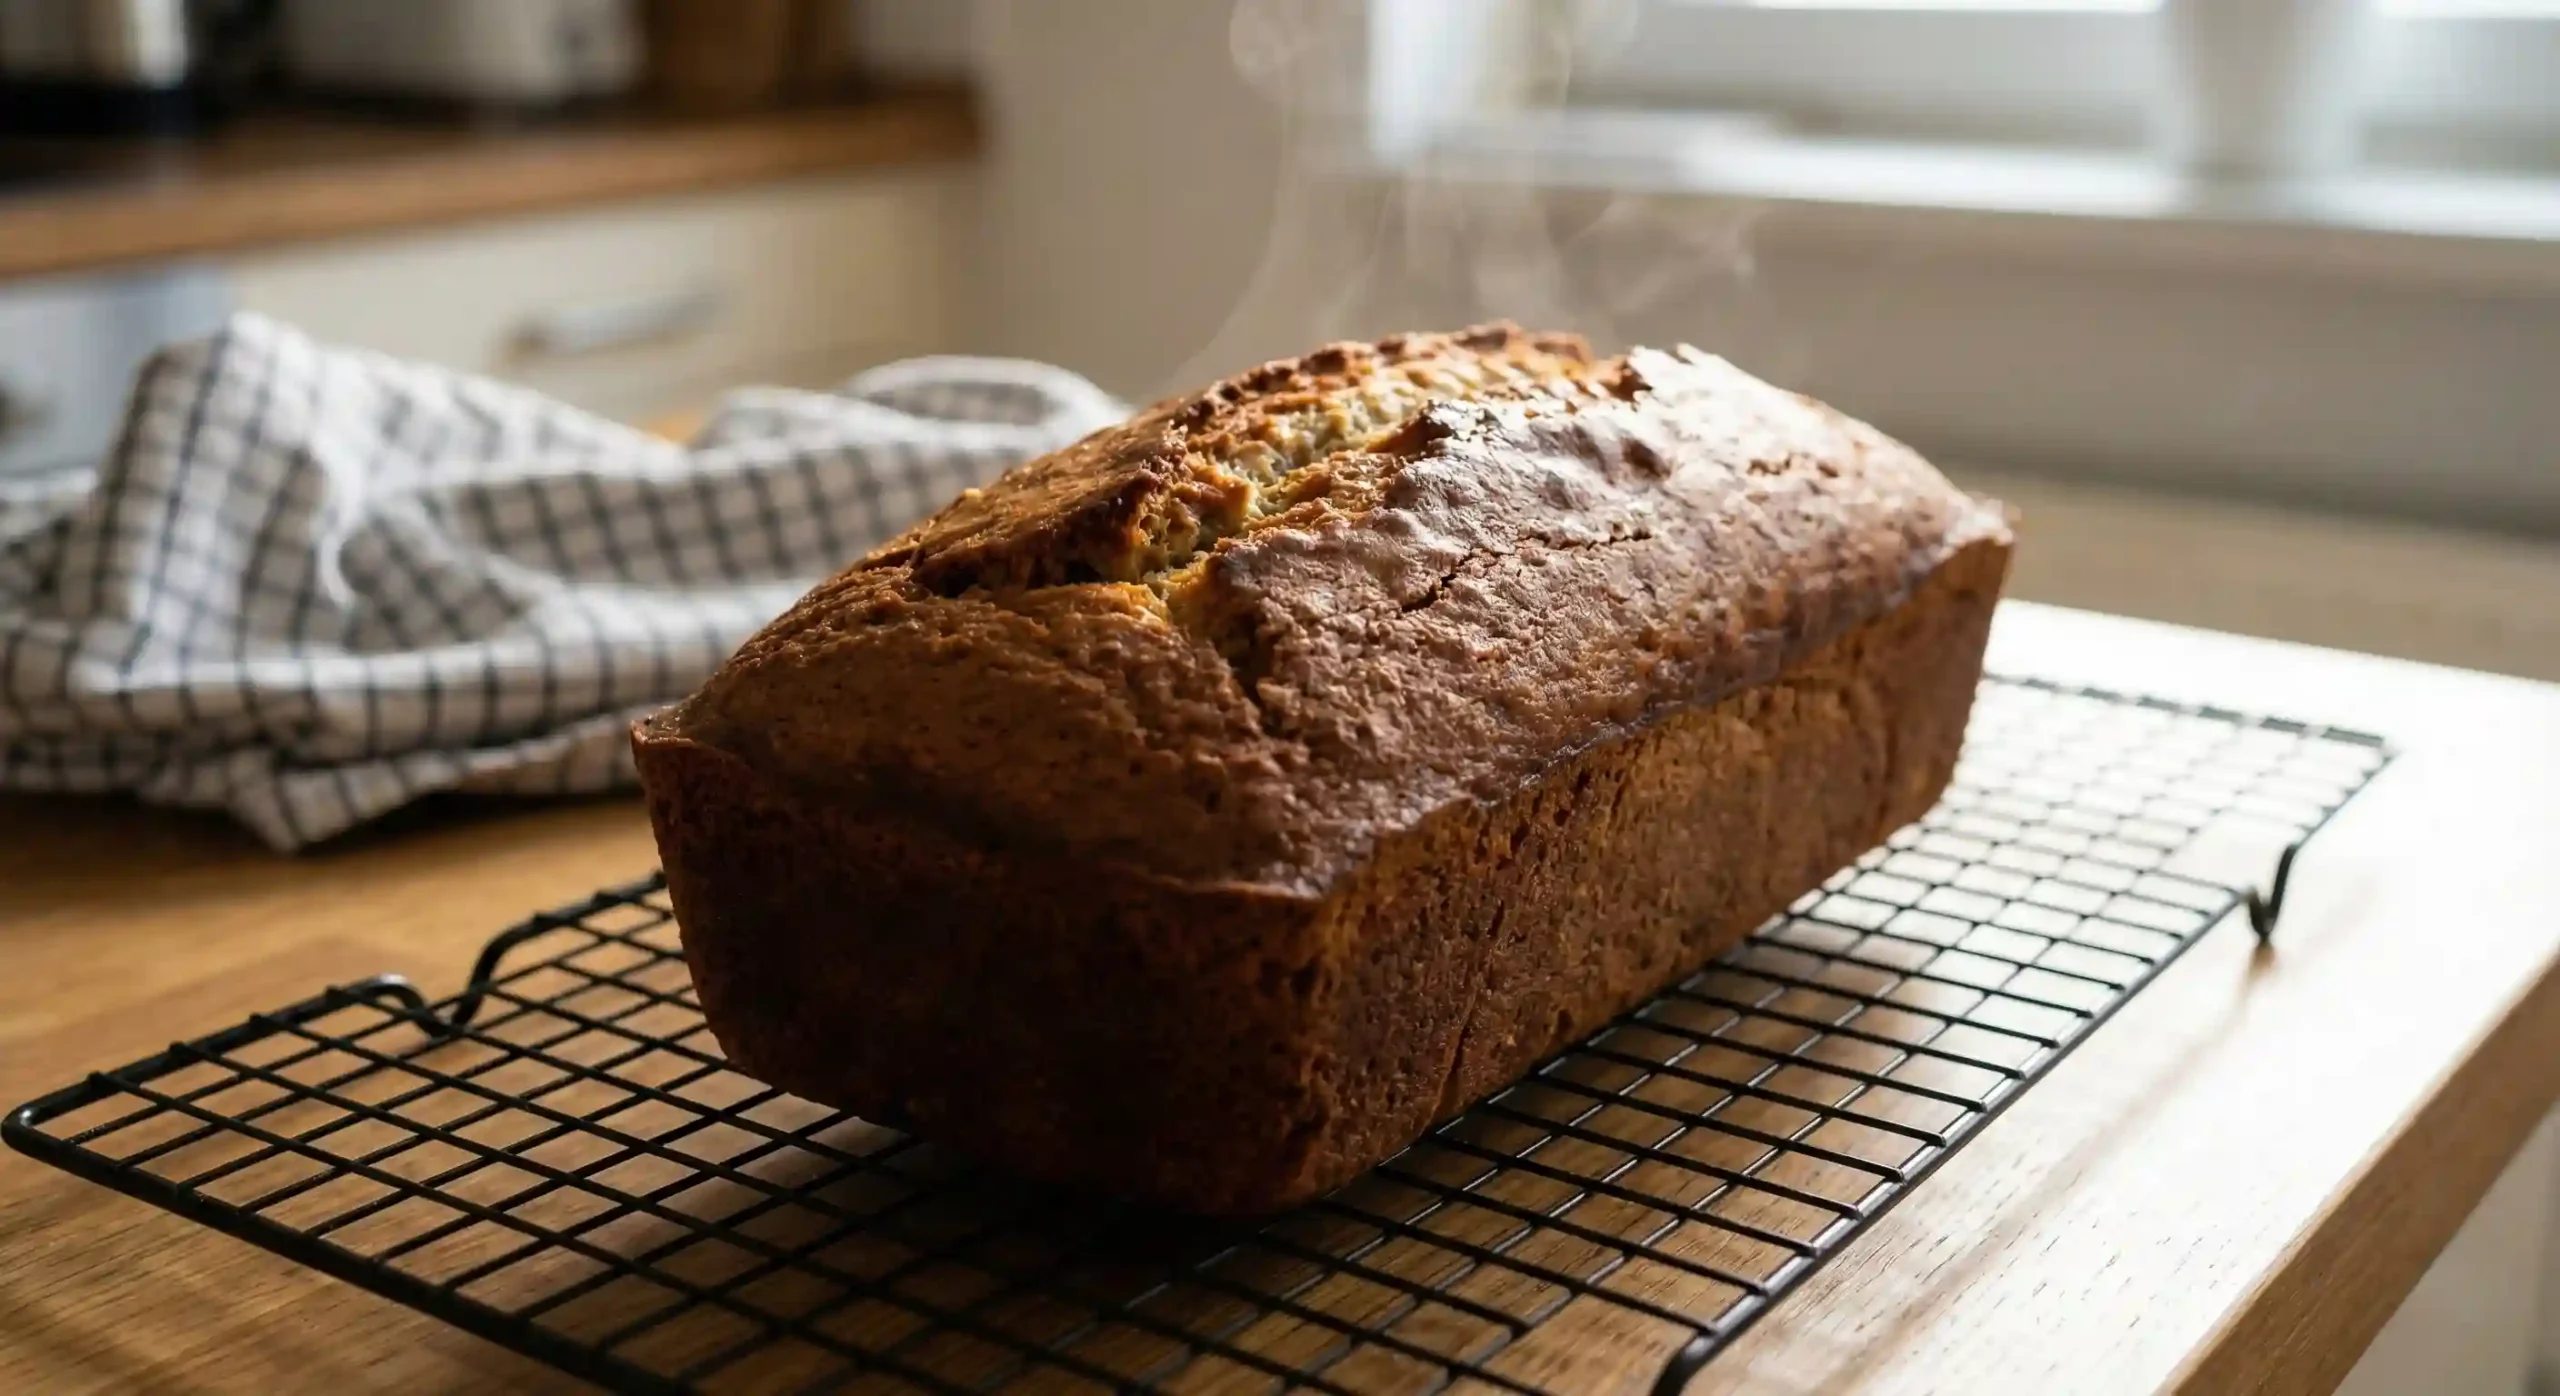
Step 5: The Cooling Phase
Patience is the hardest part. While you wait for it to cool, you have just enough time to prep a comforting dinner like Risotto ai Funghi. When you lift the loaf out, let it sit in the pan for 10 minutes. Then, move it to a rack. Cooling on a wire rack is not optional. If you leave it in the pan, the bottom will get soggy from condensation. And whatever you do, do not slice it when it’s hot. Steam is moisture. If you slice it now, that steam evaporates, and the bread dries out fast. Wait until it is absolutely cool to lock in that moisture.
Variations & Add-Ins for 2 Bananas
Once you have mastered the underlying logic of the 2 banana recipe, you are ready to get creative. Think of this batter as a blank canvas. Here is how to upgrade your loaf from “breakfast staple” to “dessert centerpiece” with a few strategic banana bread mix-ins.
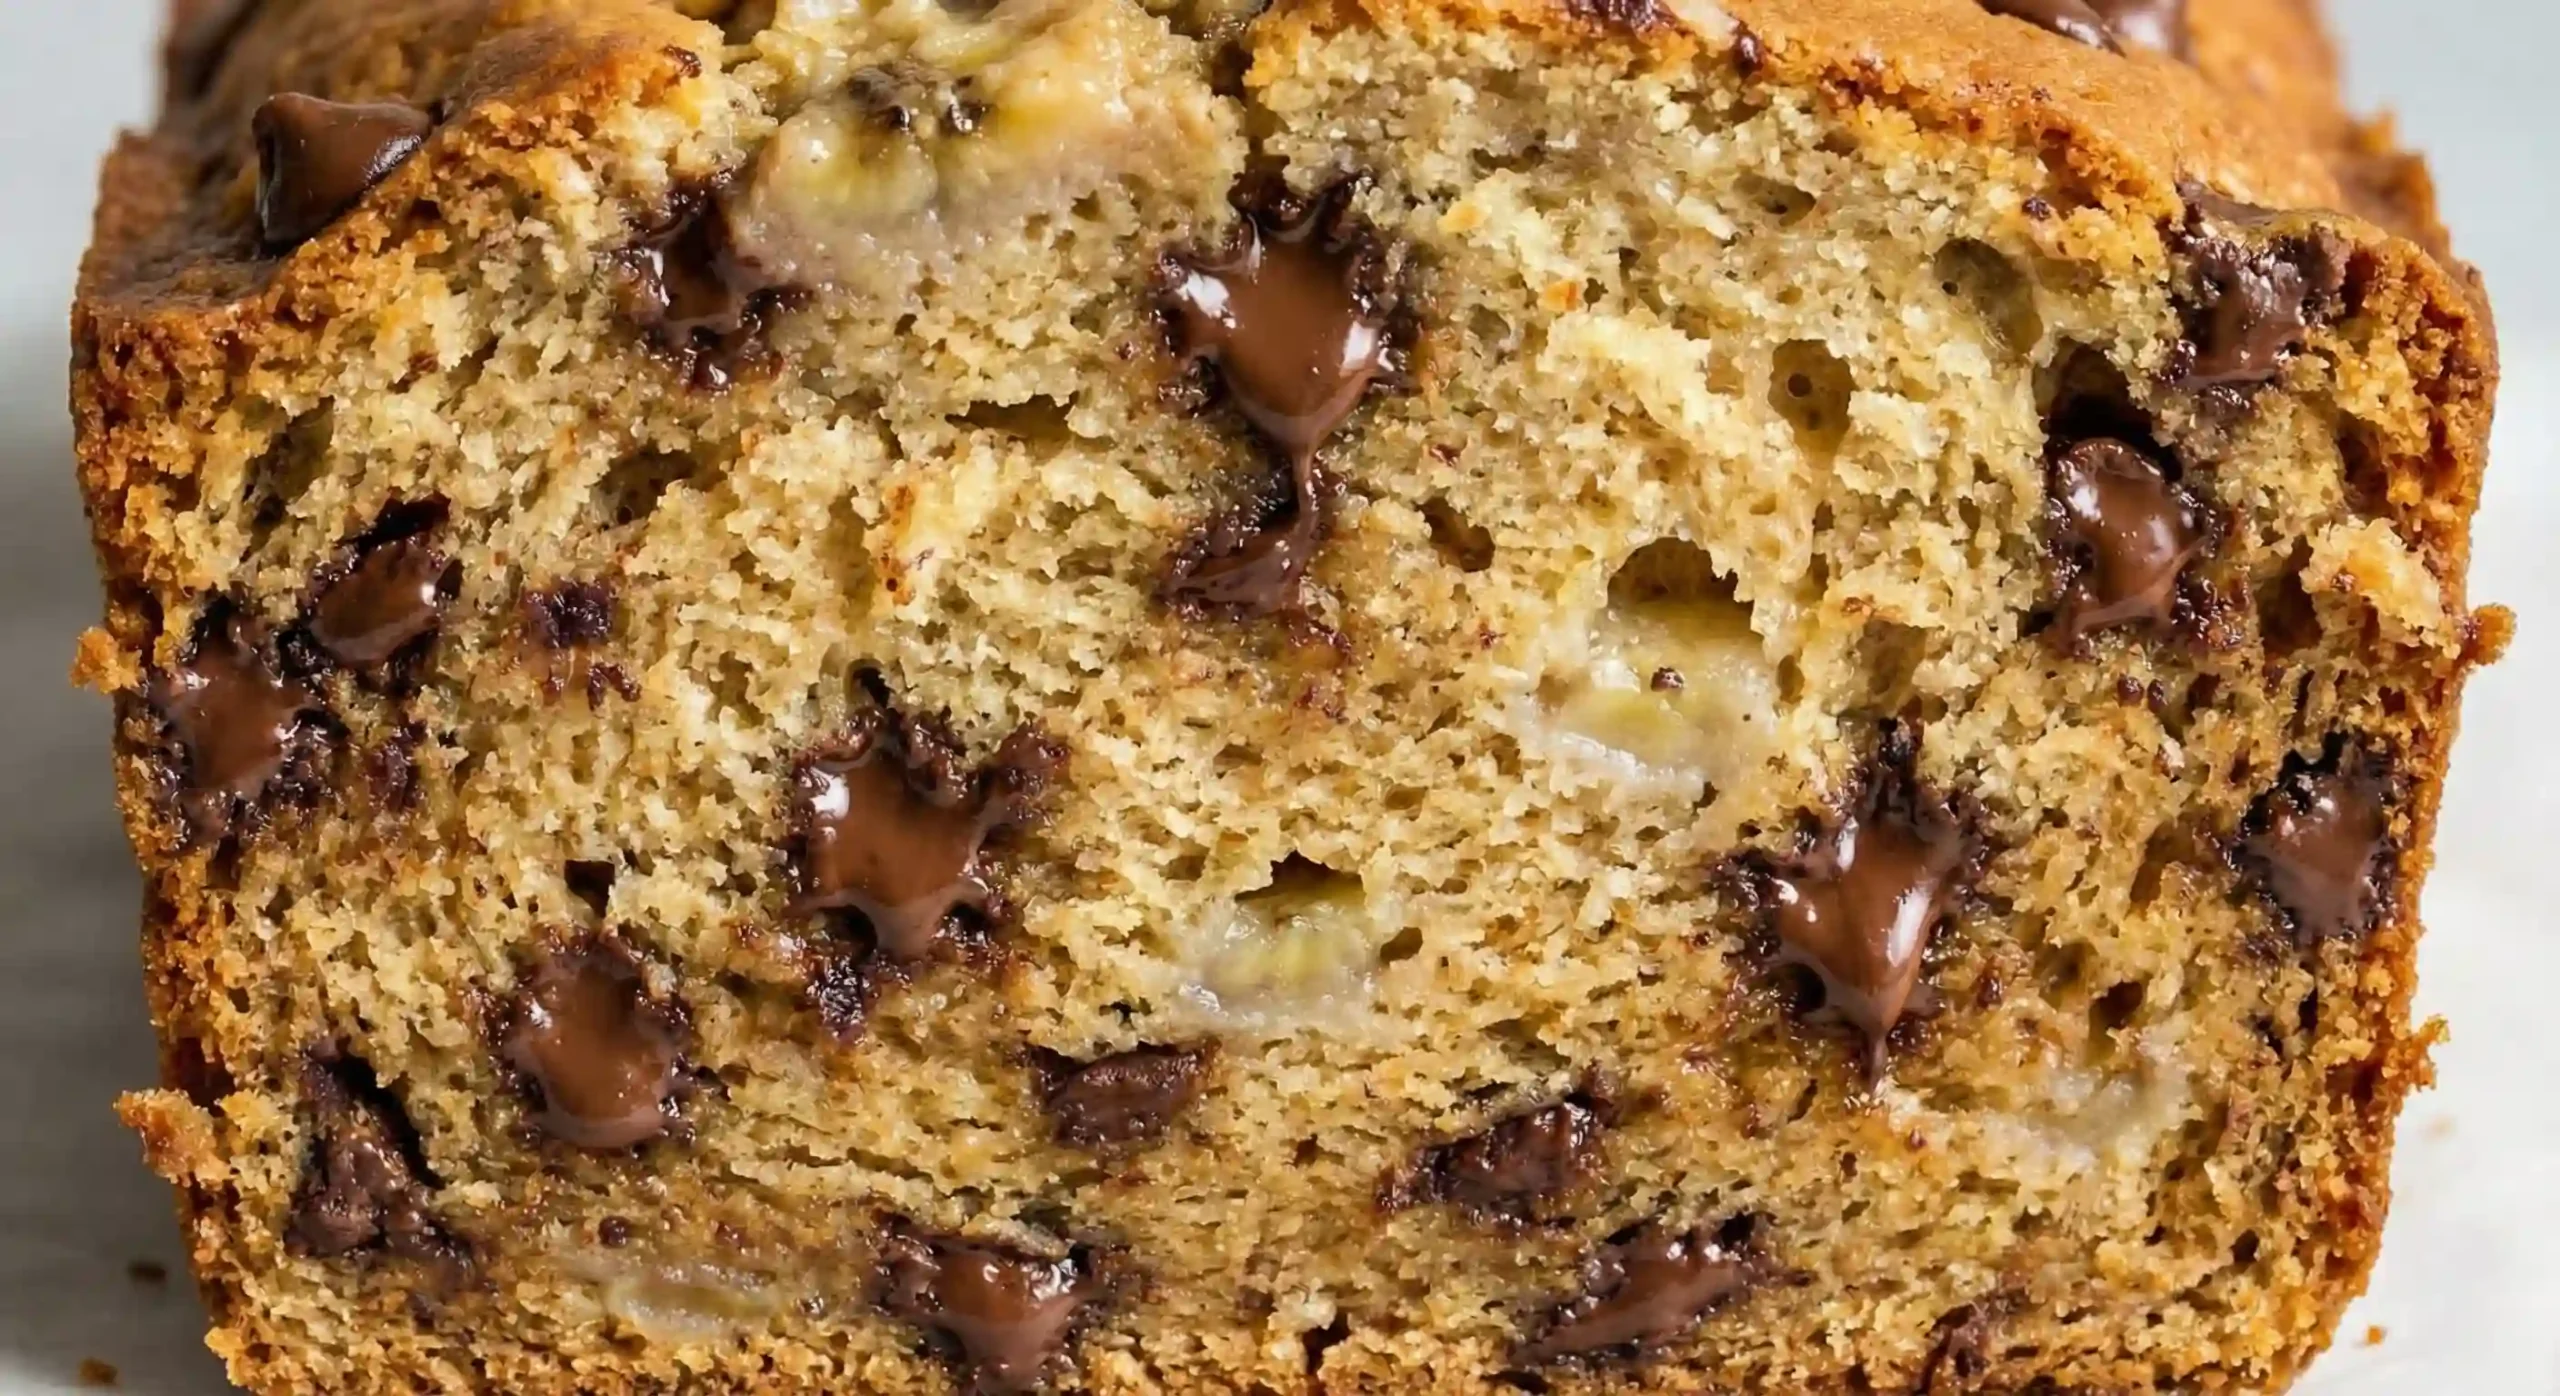
Chocolate Chip Banana Bread
Let’s be honest: chocolate makes everything better. But for a chocolate chip banana loaf, you need to choose your weapon wisely. Skip the milk chocolate because it can get lost in the sweetness of the bananas. Go for semi-sweet chocolate chips or, even better, a chopped bar of 60% dark chocolate. The bitterness cuts through the sweets, producing a nuanced balance. Fold in ½ cup of chips right at the end of mixing.
Nutty Crunch
If you crave texture, nuts are the answer. But do not just toss them in raw. Raw nuts are waxy and tasteless. For a genuinely professional flavor, use toasted walnuts or pecans. The Hack: Spread your nuts on a baking sheet and roast them at 350°F for 5-7 minutes while your oven preheats. The heat releases their natural oils and makes them crunchier. It’s a tiny step that makes a tremendous effect.
Cinnamon Swirl
Want a bakery-style visual effect? Create a swirl. Mix 2 tablespoons of sugar with 1 teaspoon of cinnamon. Pour half your batter into the pan, add a heavy coating of the cinnamon sugar, then cover with the remaining batter. Use a knife to stir it lightly. For additional points, put the remaining on top before baking for a shattering cinnamon sugar crust.
Troubleshooting: Common Banana Bread Mistakes
Even the best bakers have terrible days. Sometimes, despite your greatest efforts, the loaf comes out incorrectly. Before you dump it in the trash, let’s diagnose the crime scene. Baking involves chemistry, and if you broke the rules of physics, the evidence will be in the crumb.
Why is my bread gummy in the middle?
You slice into your golden loaf, only to find a moist, thick streak near the bottom. This is traditional undercooked banana bread.
- The Cause: Your oven was likely too hot. If the temp is too high, the outside produces a crust before the heat penetrates the inside.
- The Fix: Lower the temperature. If you fear your oven runs hot, get an oven thermometer. Also, don’t believe the timer; trust the toothpick. If it’s wet, keep baking. For a gummy bottom fix on an already baked loaf, try toasting the slices. It won’t fix the structure, but it conceals the texture.
Why did my bread sink?
There is nothing sadder than witnessing a gorgeous dome fall in the dying minutes.
- The Cause: You likely have a sunken center for one of three causes.
- The Peeker: You opened the oven door too early. A surge of chilly air might shock the batter before the structure sets.
- The Over-Mixer: You beat the batter too hard, introducing too much air that the flour structure couldn’t support.
- The Leavening: Too much baking soda generates a quick rise followed by a swift crash. Gravity is a terrible mistress.
Why is it dry?
You sought lush luxury; you got a sandy brick.
- The Cause: Almost always, there is a flour issue resulting in a dense texture.
- The Fix: You used your measuring cup as a shovel. When you scoop flour directly from the bag, you pack it down, mistakenly adding up to 30% more flour than the recipe needs.
- The Pro Move: Use a kitchen scale. If you don’t have one, try the “Spoon and Level” method: scoop flour into the cup and level it off with a knife. Do not pack it.
Storage & Freezing Guidelines
You have cooked the ideal bread. Now, how do you keep it fresh? Banana bread is really one of the few baked items that becomes better the next day if you store it right.
Countertop Storage
This is the sweet spot. How to store banana bread effectively starts with cooling it entirely. Once cold, cover it tightly in plastic wrap or store it in an airtight container. Keep it on the counter at room temperature.
- Shelf life: It keeps fresh and moist for 2-3 days. In fact, the moisture from the bananas migrates through the crumb overnight, making day two the optimum flavor day.
The Refrigerator Trap
Stop putting your bread in the fridge! The cold air in a refrigerator promotes the crystallization of starch molecules, a process known as retrogradation. Translation? It makes your bread stale faster. Refrigerating baked products essentially drains the moisture out of them. Only use the fridge if you live in an extremely hot or humid region and are worried about mildew.
Freezing Guide: The Long Haul
If you want to store your masterpiece for later, the freezer is your best friend. Freezing baked products preserves them properly for up to 3 months.
- Whole Loaf: Wrap the cooled loaf in a layer of plastic wrap, followed by a layer of aluminum foil. This double protection is necessary to prevent freezer burn.
- Slices: This is the smarter move for simple snacking. Slice the bread, insert strips of parchment paper between them (so they don’t stick), and freeze in a zip-top bag.
- Reheating Banana Bread: When you are ready to eat, place a frozen slice in the toaster or microwave for 20 seconds. It will taste like it just came out of the oven.
Conclusion
So there you have it. The days of staring at a pair of lonely bananas and feeling discouraged are over. You don’t need a third banana to achieve baking success; you just need the appropriate plan.
This 2 banana recipe illustrates that restriction breeds creativity. By understanding the chemistry of sour cream and the physics of the 8×4 loaf pan, you can transform a simple fruit bowl. This knowledge will help you make moist banana bread. This bread can compete with any bakery in town. It is fluffy, it is delicious, and most importantly, it is easy. There is nothing better on a cold day than a warm slice of this bread after a bowl of my Goya split pea soup recipe.
Don’t let those spotted bananas go to waste. Preheat the oven, mash with confidence, and enjoy the delicious smell of achievement. It’s a delicious solution for saving those spotted bananas from the bin and reducing food waste in your kitchen.
Did this recipe save your morning? We want to showcase your “short loaf” success tales! Please rate this recipe below. Leave a comment if you tried a variation, like Team Chocolate Chip or Team Walnut. Tag us when you share your photos on social media.
FAQ’s
What is the secret ingredient in banana bread?
Sour cream or Greek yogurt. Adding just a few teaspoons creates acidity. This helps the baking soda work better. It also adds fat, keeping the crumb very moist and soft for days.
What is the secret to the best banana bread?
Using bananas that are actually overripe. They shouldn't simply be yellow; they should be coated with brown spots or possibly totally black. This level of maturity offers optimal sweetness, a robust banana taste, and the optimum moisture content.
How to make an easy banana loaf?
The "Muffin Method" is the simplest approach. Whisk your dry ingredients in one bowl and your wet components (mash, oil/butter, eggs, sugar) in another. Pour the wet into the dry and stir gently until just mixed. No mixer necessary, and it avoids overworking the batter.
What is the one ingredient banana bread upgrade?
Brown butter. Taking an extra 5 minutes to brown the butter adds a rich, nutty, toffee-like flavor. This makes the bread taste better, going from "good" to "bakery-quality."
Why put a bowl of water in the oven when baking bread?
The water creates steam. This steam keeps the crust flexible at first. It allows the bread to rise fully before the crust hardens. For banana bread, this creates a higher dome and a moister inside. However, it is more common in making crusty artisan bread.
Why do people put mayonnaise in banana bread?
Mayonnaise is simply oil and eggs emulsified with vinegar. Adding it to the batter gives fat and acidity. This makes a very moist and rich cake texture. You do not need to separate oil and vinegar.
Is it better to use brown or white sugar?
Brown sugar is often best. It includes molasses, which provides moisture, acidity (helping the rise), and a richer caramel taste that complements the banana. A blend of both is typically used, white for crisp edges, brown for a soft, moist middle.
What are the three ingredients in banana bread?
The most basic "survival" banana bread includes simply bananas, self-rising flour, and condensed milk (or sugar and mayonnaise). To achieve the right texture, you need a few key ingredients. These include flour, sugar, bananas, fat (such as butter or oil), and a leavening agent.
What to add to banana bread for more flavor?
Beyond chocolate chips or nuts, consider adding spices like cinnamon, nutmeg, or cardamom. A splash of vanilla extract is important. A teaspoon of espresso powder or a little whiskey can improve the chocolate and banana flavors. They won't make the flavors too strong.